Many of you may be considering making a shirt from View A of Timeless and Modern, which is featured in this week's ad (3/15-22/20). It's a beautiful shirt which can be worn on its own or layered over a tee or shell, so it can be doubly useful in your wardrobe.
The shirt features a classic sleeve placket that may look a bit complicated or challenging, so I thought I'd give you some step by step help on getting great results. It might be helpful to get out your placket pattern piece to refer to as you read these steps.
I'll cover half the steps in this post, and I'll finish in my next post. You might want to make a sample to get the hang of this.
First, here's a look at a finished placket. This one is from my denim shirt. It's accented with stitching with 2 threads through the needle, explained in a previous blog.
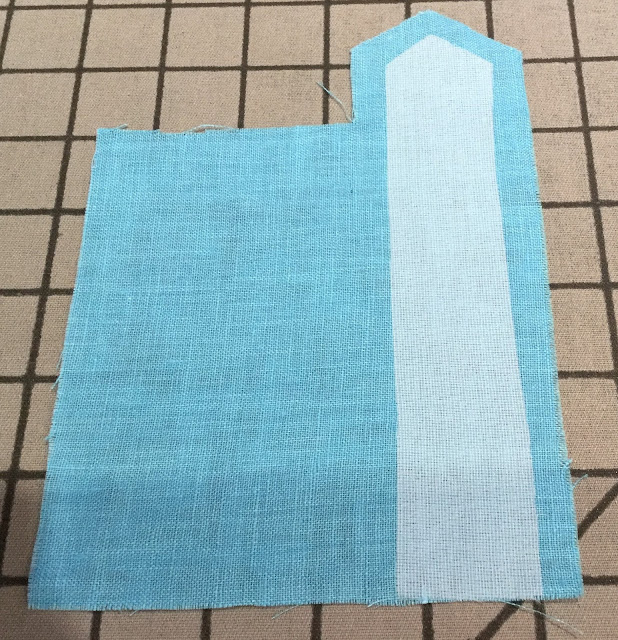
First, consider how you want to interface your placket. If your fabric is midweight, you can simply interface the portion of the placket that will be visible when it's finished (the portion you see in the photo above). Here's what that interfacing will look like.
If your fabric is especially light, you could decide to interface the entire placket. In fact, you could block interface a piece of fabric just a bit bigger than the pattern piece for the placket, like this:
Then use your pattern piece to cut your placket from the interfaced block. Here's an example. At the bottom of the placket, I've turned up little corners to show you where the clips are, and I've marked the stitching lines for the sleeve opening.
You'll also need to staystitch at 3/8" on the vertical edges and the edges of the top peak to guide your pressing. I used contrasting thread, so you can see the stitching in the next photo, where I'm showing you how to use a Pressing Template to get accurately pressed edges. Note that at the top of the photo the long vertical edge as well as the diagonal edges for the peak at the top are already pressed.
Look carefully at the photo above. At the upper left, you'll see a short line of staystitching. You'll need to press that area as well. Here's how to place a Pressing Template to press it accurately.
And this is what the placket looks like when it is completely pressed. The scissors are holding the placket flat so you can clearly see all the pressed lines.
Here's another view:
And another way to look at it follows. At this point, take a careful look at the peak to verify that it is centered and that the diagonal slope on each side of the peak is even. This is the best time to fiddle with it if it is not quite right.
All this preparation is key to getting a good result. I've found that the cutting, marking, and pressing takes a fairly short time, but it really sets up a process that ends with a lovely placket.
So now that you have a properly prepared placket, you can place it on the wrong side of the sleeve, with the placket right side down. The peak of the placket must point to the notch at the front of the sleeve cap. In this photo, the scissors are pointing to that front notch, and you can see that the peak is on that side.
Above, I've stitched the placket opening. I began at the bottom edge of the sleeve with a stitch length of 2.0. I changed to 1.5 when I was 1/4" from the first top corner. Up to the corner, across the top, and 1/4" down the other side, I used the 1.5. I switched back to 2.0 to finish stitching down the other side.
Then I cut right up the center of the stitched box to within 1/4" of the top. At that point, I cut toward each top corner. You have to both brave and careful here! You should cut right up to the stitching at the corners, but be sure you don't cut through the stitching.
You'll have some time to prepare a sample to this point, practicing the pressing and stitching. I'll finish my coaching in the next post about pressing and stitching the applied placket.
I hope you find this post helpful. By the way, you can apply the same steps to the plackets in View A of The Blouse Perfected also. Be sure to visit us at cuttinglinedesigns.com to see all the fabrics that would make beautiful shirts as well as exquisite interfacings and many notions that can make your sewing easier.


