Wednesday, December 1, 2021

 I hope you've already read my previous post in which I explained the applique process Louise used to make her sensational Light and Shadow vests.  

In this post, I'll show you photos of her second vest.  They'll give you more ideas.  Then I'll explain how she created her faux sashiko stitching.  First, the pieces of the vest with applique and stitching.

Here's the Right Front.  Louise used a black and white print, cutting it to show various motifs.  She also used a yellow print.


And the Left Front.  Note that there's no applique where the Left Front will slide under the Right Front.


Here's a detail of the cowl.  


Two close-up photos to show you details:


Now I'll explain the steps to achieve the faux sashiko stitching.  First, you'll need thread.  Louise used 6 strands of DMC embroidery thread.  She did not separate the strands at all, but used them just as they were.  She advises using a crewel or tapestry needle, since those are sharp and have large eyes to accommodate the 6 strands.

Prepare the vest pieces for the stitching.  On each piece, consider how lines of stitching will help the appliques relate to each other.  Use a straight and/or fashion ruler to mark straight or curved lines, using her vest for inspiration.  Use white chalk (from a Chalkoner) as your marker.  (Colored chalk may not all come off your fabric.)

Next, thread your machine with typical white thread.  Using a 6.0 stitch length, stitch along your chalked lines.  Be sure to use this stitch length, as it will help you with your sashiko.  Again, consult the photos.  Louise also stitched over some appliques.  Look carefully--she changed colors where she stitched over an applique.  She really considers the details!

You're ready for sashiko.  Thread your crewel or tapestry needle with a length of the DMC 6-strand thread.  Knot the end.  Bring your needle up from the wrong side at the end of a line of machine basting.  Let the DMC remain on the right side of the fabric for the length of 1 white basting stitch.  Take your needle down to the wrong side, skip the length of the next white basting stitch, and come up again to repeat.  So your sashiko will show beside every other basting stitch.  At the end of the line, make a knot on the back.  Have fun!  

Be careful to avoid catching the white machine basting.  When your sashiko is complete, remove the basting.  The white thread will not leave any marks on your fabric.

Here are the front and back of this second Light and Shadow vest.


We hope you'll give this project a try.  You'll have a piece of art when you're done, and you can try designing other projects using the same techniques.  Other sewers will be amazed!


Sunday, November 28, 2021

 Hello all you creative sewers out there,

This blog post is going to show you a fabulous project.  It's one of Louise's inventions; she taught it at 2 ASG Conferences and at a retreat or two.  Now we'd like to show you how it all works, so you can do it yourself at home.  We've had many requests to teach this again in person, but we decided to extend the how-to's for all of you instead.

Louise based her vest on our Light and Shadow pattern.  She used the usual pattern pieces to create her vest.  The special part of this is the applique and the faux sashiko stitching she designed with.  In this post, I'll show you step by step photos of how she created the unique look.  Please read through the entire blog so you'll understand the process before you start.

She cut out the vest pieces from linen.  Then she chose a print (use linen or cotton) to cut up for her applique pieces.  This one had so many colors in the print that she only needed one fabric for all the appliques.  

Let's see the vest, so you can see how fabulous this project can look.  Here's the finished vest back:


And the finished front: right front over left front.  You can see how the cowl drapes in this photo.


You can also see that she didn't fussy cut individual shapes from the print.  Instead, she cut circles and blocks in interesting shapes, even cutting through some individual motifs in the fabric.  Take a close look to see what I mean.  Also note that some small appliques slide just a bit under the edges of larger appliques.  

Here's the back laid flat on the table to give you a clearer view:


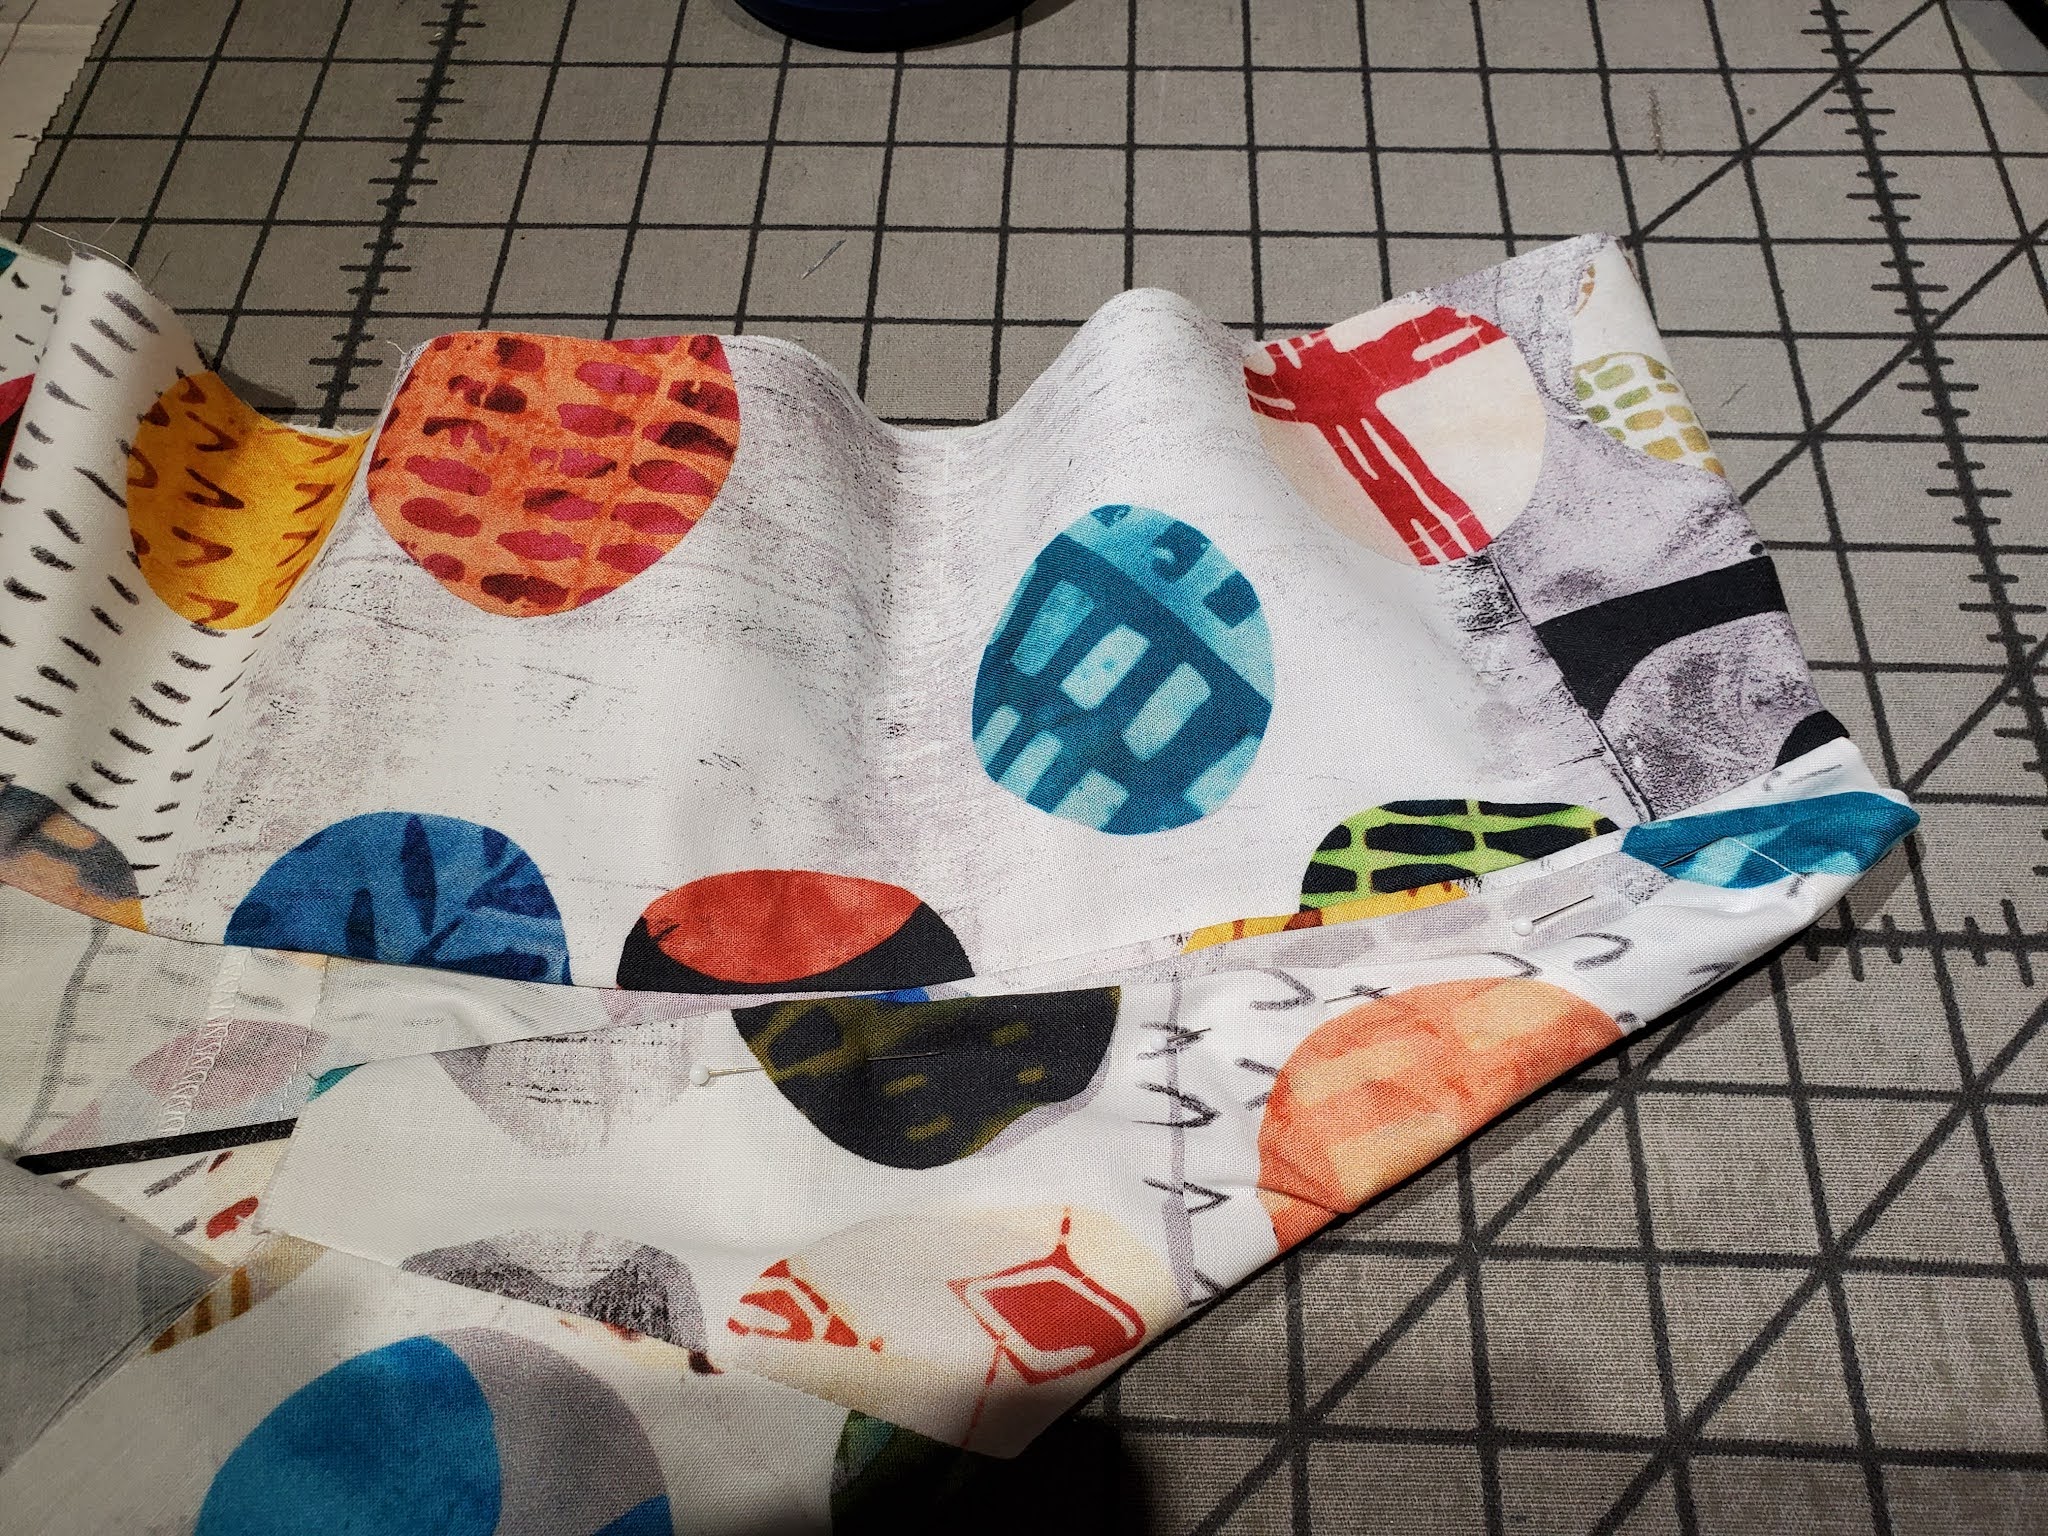
I'll point out a few details, then explain how the process works.  Note the little tabs tucked under the circle at the upper right.  Below that is a long strip with a short strip tucked under it near the top, and on its left a triangular shape with one edge tucked under.  Three blocks on the left overlap each other slightly, with 2 small shapes added.  On the left side seam edge is a strip folded double, with its folded edge extending onto the back piece.  When the side seam is sewn, the raw edges will be caught in the seam, while the folded edge will extend from the seam.  (I'll address the faux sashiko stitching later.)

Let's talk about how this works.  Cut out your vest pieces and set then aside for a few minutes.  Lay out your applique fabric(s) and just look them over.  Begin cutting out shapes: squares, rectangles, strips of varying lengths and widths, circles, half circles, etc.  It's more effective to keep the designs abstract, focused on the colors, than to fussy-cut flowers, leaves, or other motifs.  Once you have lots of shapes, begin laying some of them on a vest piece, moving them around until you like the overall look.  Here's Louise's preliminary layout on the back.  You can see the raw edges of her applique pieces.


Another view of the back.  Note that the small pieces that will eventually tuck under the larger pieces are on top at this stage.


This photo shows that folded piece at the side seam.  She eventually shortened this to keep it out of the miter.


Once you've finished your applique layout on a vest piece, take a photo to help you remember your design.  Also, put pins around each shape so you'll put it back in the same place as before.  Like this:


 Above is a photo of the cowl with pins marking the location of each applique.  Keep all your applique pieces near center front of the cowl.  (At the sides and back, you'll want to allow the cowl to fold down on itself; appliques would make it too stiff there.)  Once you've marked placements with pins, remove the pieces.  You'll have this:


NOTE:  Place your Right Front vest piece on top of the Left Front vest piece.  Use chalk to mark the edge of the Right Front on the Left Front.  You won't need any applique on the Left Front where it lies under the Right Front.  Here are Louise's right and left fronts with their preliminary placements.


The next step is to deal with the edges of the appliques.  First, let's talk about the circles.  Make 2 templates from file folders or similar materials.  One will be the size of a circle you want to cut.  Make the second template 1/4" smaller all the way around; you'll use it to press the raw edges under.  Staystitch, using a regular stitch length, all the way around each fabric circle, 1/4" from the raw edge.  Lay the fabric circle wrong side up on the ironing board with the smaller circle template centered on it.  Carefully press a 1/4" hem over the small template to give the fabric circle a finished edge.  

Also staystitch 1/4" from the raw edges of all the other shapes.  Use a Pressing Template to press a 1/4" hem on all edges of each shape, except where an edge of a small piece will extend under a larger piece.  

Once all your raw edges are pressed under, place strips of Steam-a-Seam on the 1/4" hems, sticky side down (pieces are wrong side up on the ironing board).  Press lightly, then remove the paper backing.  

Using the pins for reference, begin placing the appliques right side up in the placements marked by the pins.  Of course, each piece is slightly smaller now because of the hems, but your placement will be just about the same.  Also refer to the photos you took as you did the preliminary outline on each vest piece.

Once you're satisfied with your placements, press each applique piece to keep it in place.  

Using a 2.5 or 2.0 stitch length and matching thread, edgestitch each applique shape.  I find a blind hem foot, adjustable blind hem foot, or edge joining foot works well, along with moving the needle.

At this point, your applique design is finished.  In the next blog post, I'll address the faux sashiko stitching.


Thursday, September 23, 2021

 We're almost there, everyone,


When I ended the previous blog, I had just sewn the sleeve seam, leaving 2" open at each end of the seam, like this:


Now let's move on.  It's time to stitch the underarm sleeve seam from the raw hem edge (unfold the hems you've pressed earlier) to the dots at the underarm.  Be sure to match those dots accurately.  

Then stitch the side seam from the matched dots at the underarm to the matched dots at the top of the side vent.

(Let me interject something here.  In all our instructions, we suggest that you keep the paper pattern pieces with the fabric pieces you have cut.  Then the first step for each Front, Pocket, Sleeve etc. is to mark clips and dots.  You probably did that when you originally cut the pieces, but we remind you.  As you move on to each new garment section, you can quickly check that you have all the markings completed.  If not, you can do it before you sew that section.  It's much easier to mark while everything is flat, and you have the pattern right there, rather than folded away in the envelope.)

Ok, here's how the shirt looks once you've completed those seams.  The pressed underarm sleeve seam is to the right, the pressed side seam is to the left, and the hole in the middle results from leaving 2" open at each end of the sleeve seam.


Turn the sleeve right side out so it's inside the garment, which remains wrong side out.  Match the side and underarm seams at the dots, like this:


It's important to get the dots (where your stitching stopped) matched precisely.

Now fold back all the seam allowances so they are together and moved to one side of the seams.  I put a pin through one dot, then look to see that it's through the dot on the other side.  Sometimes it takes a couple of tries to get it right.


Once your dots are perfectly matched, pin to hold everything in place and stitch from where your previous sleeve seam ended to the dot, securing your stitching at the dot.  


Repeat folding the seam allowances back and stitching the open portion of the sleeve seam on the other side.


Now you're ready to serge the sleeve seams.  Note that the underarm and side seam allowances are still free.  That's the whole idea--they allow the garment to drape properly when worn.  They don't pull or pucker.


Fold down the seam allowances on one side, and begin your serging on the other side:


Begin serging on the seam allowances that remain upright, trimming them to 3/8".  Serge all the way around the sleeve.  When you approach the end, fold down the seam allowance where you started.  Your result will look like this--


This technique is used in several of our patterns, and now you know the details of how to complete this unique finish.

Next time, I'll review a few items for finishing your new shirt.


Tuesday, September 21, 2021

 Greetings again, everyone,

Let's move on to stitching the sleeves in the View B shirt from At Every Angle.  By the way, much of what I'm talking about can apply to other patterns in our Cutting Line Designs line of patterns.  So carry this info with you as you work on other shirts.

The pattern instructions tell you to serge both vertical edges of the sleeves.  It's best to serge from the underarm corner to the hem.  If you go in the other direction, you are working against the grain and you'll stretch the edge of the sleeve.

Then you can press the hem edges.  In this case, there are 2 folds so you end up with a clean finish.  First, a 3/8" fold, using one of our Pressing Templates.  (My bad; imagine this turned 90 degrees!)


Then use the same Template to press a 2" hem (all the Templates are 2" wide).  I like to press the hems while the sleeves are flat, even if I have to touch up a bit later.


Now you're ready to pin the sleeve into the garment.  As I've explained before, you are working with a concave edge (the garment) and a convex edge (the sleeve).   So the cut edge of the sleeve is longer than the cut edge of the garment.  However, the stitching line is the same length on the garment and the sleeve.  That's why you will find it easiest to pin in a certain way.  Let's look:


Note that the pins catch only a few threads right at the stitching line.  That's where the sleeve and the garment are the same.  The different edges can do what they need to.  (See the May 20 blog for more.)  By the way, sharp pins with glass heads really help.  

It may also help to see how the corners look when matched correctly.  They should cross right at the stitching line--not at the corners.

Time to stitch.  In this pattern, you begin stitching 2" in from one underarm corner and end 2" from the other underarm corner.  Like this:


Next, stitch your underarm seam of the sleeve.  Unfold the pressed hems.  Stitch from the raw sleeve hem up to the dots at the underarm corners.  Also stitch the side seam of the garment from the matched dots at the underarm corners to the matched dots at the top of the side vents.

Tomorrow, I'll explain how you'll stitch that open spot at the underarm.

In the meantime, I hope you're following along and finding info you can use in other projects.

Monday, September 20, 2021

Hello fellow sewers,

It's time for the next step in constructing the Shirt (view B) from At Every Angle.  In the last blog, we ended with beginning to pin the collar to the shirt's neckline, so let's see how that looked.


As a quick review, this collar is somewhat unusual.  As you can see in the photo, the collar is slipped down over the neckline of the shirt (in other words, the neckline is inside the collar), right side to right side, center backs matched.  At the center front edges, the collar would fold around the fronts and back on itself with the neckline sandwiched between the 2 collar layers.  Once both layers are pinned, it's time to stitch.

Look closely at the stitching below.  I sank my needle with the fabric turned in the opposite direction and stitched to the end of the collar.  Then I turned the collar around as you see below.  I like this technique because it avoids the dimple in the fabric's edge that backstitching often causes.  Now I'm ready to stitch across the combined collar/neckline.  I'll mirror image this technique at the other end.


Same view as above.  


Once the collar/neckline seam is stitched, it must be graded and clipped.  I've mentioned in other blogs that we now clip on the diagonal.  I clipped one layer, then turned the collar/neckline over and clipped in the opposite direction, and so the clips don't overlap.  Thus no ridges or gaps press through to the right side.


Below, I'm pressing the collar up and away from the neckline of the garment.  You can see that the top edge of the collar is open.  See the raw edges?


You might be wondering, "How on earth do I close the top of that collar now?"  It can be done!  Of course, all of this is explained and illustrated in the instructions, but it's helpful to see it done.

You'll roll the front edges of the shirt and pin them out of the way, like this:


Note that I've pinned the rolled front.  It can be rolled again on top of itself.  Once you've rolled each front, you can pull the collar down over the garment, wrong side out, and pin the edges together.  Begin stitching the collar at each center front end and stitch toward the center of the collar as far as you reasonably can.  Grade the seam allowances where you've stitched and press them open over a point press.  This photo is showing you one end of the collar. 


Once you've stitched and pressed both ends, you can turn them right side out, using a point turner to walk out the corners.  The middle of the collar will still be open.  Turn the seam allowances down inside the collar, pressing them carefully so they are even.


Once the pressed seam allowances are perfect, trim them to 3/8".  Slide a strip of Steam-a-Seam between them, remove the paper backing, and press to fuse this last part of the collar together.  Finally, you'll edgestitch the collar.  Work on the side of the collar that will show when worn and begin stitching at center back where the collar joins the neckline.  Edgestitch all the way around.  You did it!


Next, we'll construct the sleeves.  We have different way of finishing the underarms, so I'll show you that in the next blog.


Saturday, July 24, 2021

 Hi fellow sewers,

At last I am getting back to sewing my At Every Angle view B shirt.  I've been working on projects that had preliminary deadlines, and you'll see the results later.  But for now, I can continue my shirt!  I've reached the point of working on the collar.  One reason I chose to create blogs for this shirt, besides the fact that I love it, is because the collar is constructed in an unusual way.  I'll go through all the steps.  The early steps might be a review for some of you, but others may find some of the techniques to be new.

The first step is to interface the collar.  Of course I'm using one of our lightweight fusible interfacings, which I've preshrunk according to the instructions available on the website.  (Take a look at the Interfacings page. If you click on an interfacing to read about it, you'll also see, right below the Add to Cart button, that our instructions for using our interfacings are only a "click" away.)  

I've laid out my piece of parchment paper (the same stuff you bake cookies on) on my ironing board.  The fabric collar goes on, wrong side up.  The interfacing goes on, glue side down.


The collar pattern goes back on top to check the shape of the collar/interfacing "sandwich".  If the shape is distorted and the interfacing is then fused, the collar will never lie properly--so be sure to check.  Remove the pattern.


Then my silk organza press cloth goes on top to form what I call my interfacing "sandwich".  The parchment paper protects my ironing board, and the press cloth protects my iron.  


Beginning in the center of the collar, I lower the iron straight down onto the layers.  One shot of steam, count to 6 or 8, then pick the iron straight up, move to the next area, and repeat till the entire collar is fused.

Next, pin the short ends of the collar together, stitch at 5/8", trim to 1/4", and press the seam allowances open.  (Use really sharp pins with glass heads that won't melt when you're pressing near them.) Now the unusual part of this collar begins.  First, let's look at how the collar edge compares to the garment neckline edge.  Unfortunately, I laid the collar down with the edge that attaches to the garment toward the top of the photo, but the point remains that you're trying to attach a straight edge to a circle.


So how can you make that easier?  Once again, the trick is in the pinning.  At this point, I'll explain that there's no neckline facing on this shirt.  The collar encases the neckline edge of the garment.  So pinning is crucial.  First, make sure you are pinning the edge of the collar with the shoulder match dots.  It's the shorter edge.  Also, you'll pin one layer at a time.  Begin by matching the short seam of the collar to the center back clip of the garment, right side of collar to wrong side of garment.  Place a pin, head sticking out from fabric edges and catching only a few threads at 5/8".  The garment edge will be up inside the collar.  Match a clip at the front fold of the collar to a front edge of the garment and pin.  Same for the other end of the collar.  Let's look:


Match a collar dot to a shoulder seam.  My turquoise dot is barely visible in the photo above.  Pin.  Repeat for the other shoulder.  Now you can pin the remaining seam allowances.  


It's looking weird, but it's halfway there.  Wrap one end of the collar around the garment front so it's snug.  Remove your pin at that end of the collar and pin again through all the layers.  Repeat at the other end, then repin the entire collar by placing each section of the second layer, removing your pin, then replacing it through all the layers.  Match all the same clips and dots.  

I'll say again, because it's so important, that the secret to success is to pin by catching only a few threads right at the stitching line.  The fabric edges--one curved and one straight--don't want to cooperate with each other.  Look at the edges in the photo above.  The only part of this seam that you want to control is at the 5/8" line.  Let the edges do what they want.  You take control where you need to stitch.

Once everything is accurately pinned together, you can stitch across the seam at 5/8".  I love this pinning technique; no matter which side is up when you stitch, it's easy to remove each pin when you come to it because the heads are out where you can see them.   Just to be clear, I'll say again that the garment is up inside the collar.  

This is already a long post, so I'll cover the second part of the collar construction in my next post.  I hope you're finding it helpful and that you are making an At Every Angle shirt along with me.


Monday, June 7, 2021

 Hello again, everyone,

In today's blog I will focus on the Pocket and on joining the Backs.  First, let's look at the Pocket.  

As you may remember, I laid the Pocket pattern on top of the stacked Right Front pattern piece on the Right Front fabric piece and drew the motifs on the Pocket pattern.  Then I matched the drawn circles to the appropriate circles on the fabric and cut the Pocket.  Here's a photo illustrating the result:


So now it's time to prepare the Pocket.  In accordance with the instructions, interface the top facing, serge the top edge, press it down into place, and topstitch across it next to the serging.  Staysitch down both sides of the Pocket and across the bottom at 3/8".  

Using a Pressing Template, press the bottom of the Pocket first.  This helps avoid any little "pokies" inadvertently peeking out from the bottom of the finished Pocket.  Then press the sides at 3/8".  Lay strips of Steam-a-Seam on the 3 edges of the Pocket, press gently, and remove the paper backing.  Here's a photo of the Pocket when it's fully prepared.


All the info I just mentioned is in the instructions.  I'd like to say a couple more things about our technique.  You'll see 1 dot on the Pocket pattern.  It should be placed on the matching dot on the Right Front.  (Most patterns show 2 dots, but if either dot is marked incorrectly, the Pocket can be crooked. Also, it's easy to get just a bit off-grain when marking those 2 dots.)  

Once you've matched that dot, you can measure from the side of the Pocket to center front from the top to the bottom of the Pocket to be sure it is placed correctly on the Front.  The Steam-a-Seam makes it easy:  it's slightly "sticky" so it will stay where you put it, but its position can be corrected. That's really useful if you're using a solid fabric or a different sort of print.  Of course, my Pocket is being matched to the motifs underneath.  So I placed it carefully to ensure the matching and pressed it in place.  Now it can be stitched perfectly.


Of course the instructions show a "map" of the Pocket stitching.  Again, I used the blind hem foot to stitch right on the Pocket edge.  I began where the previous line of topstitching intersects the side of the Pocket.  The top of the Pocket is toward me and I'm stitching to a point 3/8" in from the top corner (marked by a pin).


At the top edge, I pivoted to stitch across the top corner (anchoring the 3/8" seam allowance underneath--use a pin to tuck away any bits that may be sticking out before stitching).  Count your stitches to the corner.  Pivot again to stitch down the side and on around the Pocket to the other corner.


At the final corner, pivot to stitch across, again making sure the 3/8" folded edges are tucked away, and stitch the same number of stitches you used on the first corner.  Finally, stitch diagonally to mirror image what you did on the first corner.


Ta-da!  A perfect pocket.

Now we move to the Backs.  Prepare them in the same way as the Fronts.  Serge the side seam edges, staystitch the hem and vent at 1/4", press the 1/4" to the wrong side.  Stitch the miters and press the vent and hem at 1".  (If you missed this info, see my previous blog from June 4.)  Finally, cut a 4" piece of Steam-a-Seam and slide it under the Left Back hem, starting at center back.  Press, remove the paper backing, and fuse.

Now a really cool thing can happen.  Normally, the Backs would be pinned and stitched as usual.  But this time, I have cut my fabric to match the motifs down center back where the seam is.  So I used a different technique.

First, I pressed the 5/8" center back seam allowance on the Right Back to the wrong side.


  Then I placed Steam-a-Seam on the seam allowance next to the fold down to the dot marking Left Back hem.  


Once I've pressed lightly and removed the paper backing, I can lay the Right Back on top of the Left Back and match the motifs just as I did on the Pocket.


Once all the motifs were perfectly matched, I pressed to fuse the Backs.  Then I could turn back to the wrong side, Right Back on top of Left Back, prepared for stitching.  The pin marks the dot at the Left Front hem, where I secured my stitching.


Finally, I serged the seam allowances together, trimming only any loose threads.  At the bottom, I left a long serger chain.  I put it through a needle with a large eye and threaded it back through the serging to keep it secure.


When I was finished, I had perfectly matched Backs with a secure finish, and it was easy to accomplish.


I have decided not to edgestitch and topstitch according to the instructions.  I don't want rows of white stitching showing on my colored circles.  I'll show you a different option when I am ready to finish the hems.

If you're following along, I hope you're enjoying these blogs and finding them helpful.