Sunday, March 29, 2020

INTRODUCING THE GO-TO TOP

Hi to all you sewers out there,

Today we'll start a new project.  Louise has always loved the cute top in the Anything But Ordinary pattern.  One day she had a stroke of genius and created a new interpretation of it.  It's looser, more casual and comfy, and easy to make and wear.  She named it her "Go-To Top".  


Today, I'll show you the pattern changes needed, so you can make your own Go-To Top.  It's a terrific top for our new at-home days, allowing us to be at ease but looking good.

I began by tracing my front and back pattern pieces.  (That way, the originals are always available.)  Add 2-3/4" to the hem edge so your top will be longer than the original.  We'll also be adding a side vent.

Once you've traced the front pattern and added the hem, draw a line parallel to center front that begins about 1/3 of the way from the neck to the shoulder.  Cut along that line and add 3/4" of tracing paper.  


Now do the same with the back pattern piece.  Overall, we're adding 3" to the total circumference (3/4" per quarter of the pattern).  Louise also added an additional 1/2" of length at center back of the hem (over and above the 2-3/4" explained above).  Use a fashion ruler to curve back up at the side seam.


Also ignore the red dot near the hem on the back pattern above.  It's a mistake!!  In the next blog, I'll show you how to sew the side vent.

You'll need to true the edges where you added the 3/4".  Here's the hem edge: 


And here's the shoulder edge.


And you need to lengthen the sleeve.  Louise made hers a 3/4 length sleeve.  A couple of things to think about--adding to the front and back moved the shoulder seam out.  Measure your body from the neck, over the shoulder, around the elbow, to the place where you want your sleeve hem.  Subtract an inch because the neckline finishes about an inch from your neck.  

Now tape tracing paper to your sleeve (or trace the sleeve pattern and add paper).  Measure across the front pattern shoulder seam (measure stitching line to stitching line.)  Subtract from the body measurement you took.  The remaining amount is how much to add to the short sleeve to make the 3/4 sleeve.  Then add enough for a 2" hem.  Like this:


You can taper the sleeve to your preference.  

There's pretty fabric in the newsletter, so alter your pattern, choose a fabric, and get started.  You can begin sewing your Go-To top pretty quickly.  I'll give you some instructions for the side vents in the next blog, but here's one tip.

If you are making either an XS or SM size, stitch the seam attaching the neck facing to the garment with a 3/4" seam allowance rather than the standard 5/8".  That will make the neckline a bit bigger, and you won't need the neck opening and tab that are in the original pattern. 

So get started and I'll see you again in a few days with tips to finish your Go-To top.

Sunday, March 22, 2020

Sleeve Plackets part 2

Hi everyone,
 
I hope that some of you have spent a few spare minutes making a sample placket.  There's nothing like trying this technique on a sample to see whether there's anything that will give you a bit of a problem.  That way, you get to figure it out before you have the problem on an actual garment.  

I've had those nightmares of getting 3/4 of the way through a garment and finally realizing there was no way I could salvage it after making some sort of mistake.  AAAAggggg!!

Anyway, I'll post some photos of the remaining steps to achieving a pretty sleeve placket.

Let's just take a look at where we stopped in my previous post.  The placket has been correctly placed with its peak pointing toward the front notch on the sleeve cap, marked by the scissors. I've completed the stitching box and cut it open.

 
 Now I like to do an extra pressing step.  Pick up the portion of the placket to the left of the stitched box, lay it on top of the stitched box, and press it flat right at the stitching.  Lay it back in its original position.

Pick up the portion of the placket to the right of the stitched box, lay it on the box, and press along the line of stitching.

Finally, push the bit of fabric at the top of the stitched box down toward the bottom of the sleeve and press.

I do this pressing now to make the next step easier and more precise.  Let's see how things look when that pressing is done.


 Ok.  At last it's time to push the placket through the opening to the right side of the sleeve.  Yay!  Push it through, then grasp both sides of the placket right beside that short top edge of the stitched box and pull gently.  You're opening the top of the stitched box, forcing that short top edge to lie flat.  


Now you can deal with the short side of the placket.  In this photo, it's ready for your next step.


Fold the 3/8" pressed edge wrong side to wrong side so it extends a thread or two beyond the stitching of the box.  Stabpin it in place and press.  


Slide a strip of Steam-a-Seam under the placket, press lightly, and remove the paper backing.  Verify that the placement is perfect, then press again to fuse the placket's short side. (Louise and I use 1/4" Steam-a-Seam Lite.  It uses a minimal amount of glue and makes steps like this easy to execute perfectly.) 

Using the appropriate presser foot and changing your needle position, edgestitch the placket a few threads from its edge.  In this photo, I've marked the stitching line.


We're almost there!  Now we'll treat the long side of the placket in the same way.  Here it is lying on the finished short side ready to be folded.


Fold it on itself, extending the edge a thread or two past the stitching underneath.  Stabpin and press.  Examine it carefully, making sure it's straight and the peak is even.  Make any needed corrections.  (Glass-head pins allow this kind of stab pinning and pressing.  The glass heads won't melt!)


Let's just make a quick check of the back side of the placket (on the wrong side of the sleeve).  There are those little ends at the top of the placket.  Make sure they are tucked up inside.  The first photo shows them sticking out, and the second shows them tucked inside.


Ok.  Now all the details are perfect.  Time to lay strips of Steam-a-Seam under the vertical edge of the long side of the placket and the peak.   Be sure you are fusing the correct side of the placket!  You don't want to glue it closed!  Make sure you have transferred the markings from the pattern that show you where the final edgestitching should be placed.  The plackets on the right and left sleeves must be stitched in opposite directions.  This photo shows you the stitching.  I've included arrows to show you the direction I've stitched and long thread tails to show you where I began or ended.  On one placket you'll begin at the bottom edge of the sleeve.  On the other, that's where you'll end.


 This final photo shows how the plackets will still open if you've edgestitched them correctly.


I hope you've had fun executing a pretty placket.    Plackets may seem intimidating, but if you just move ahead step by step, you'll be successful.   

Thursday, March 19, 2020

Hello everyone,

Many of you may be considering making a shirt from View A of Timeless and Modern, which is featured in this week's ad (3/15-22/20).  It's a beautiful shirt which can be worn on its own or layered over a tee or shell, so it can be doubly useful in your wardrobe.  

The shirt features a classic sleeve placket that may look a bit complicated or challenging, so I thought I'd give you some step by step help on getting great results.  It might be helpful to get out your placket pattern piece to refer to as you read these steps.

I'll cover half the steps in this post, and I'll finish in my next post.  You might want to make a sample to get the hang of this.

First, here's a look at a finished placket.  This one is from my denim shirt.  It's accented with stitching with 2 threads through the needle, explained in a previous blog.

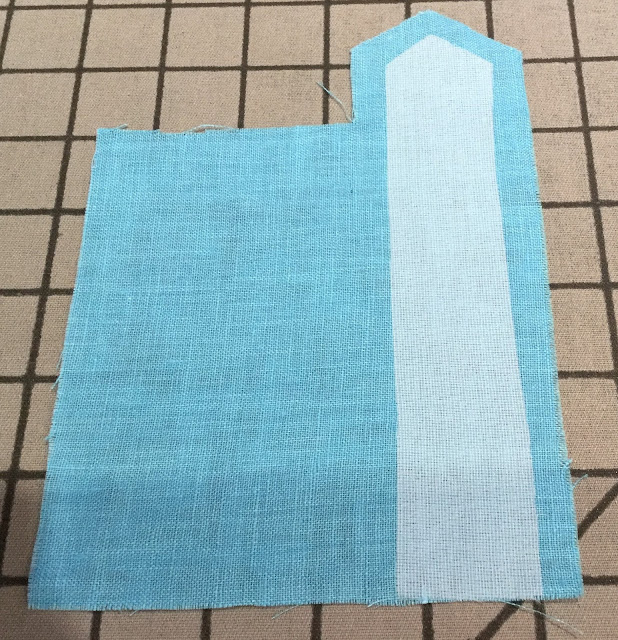
First, consider how you want to interface your placket.  If your fabric is midweight, you can simply interface the portion of the placket that will be visible when it's finished (the portion you see in the photo above).  Here's what that interfacing will look like.

If your fabric is especially light, you could decide to interface the entire placket.  In fact, you could block interface a piece of fabric just a bit bigger than the pattern piece for the placket, like this:

Then use your pattern piece to cut your placket from the interfaced block.  Here's an example.  At the bottom of the placket, I've turned up little corners to show you where the clips are, and I've marked the stitching lines for the sleeve opening.  

You'll also need to staystitch at 3/8" on the vertical edges and the edges of the top peak to guide your pressing.  I used contrasting thread, so you can see the stitching in the next photo, where I'm showing you how to use a Pressing Template to get accurately pressed edges.  Note that at the top of the photo the long vertical edge as well as the diagonal edges for the peak at the top are already pressed.


Look carefully at the photo above.  At the upper left, you'll see a short line of staystitching.  You'll need to press that area as well.  Here's how to place a Pressing Template to press it accurately.


And this is what the placket looks like when it is completely pressed.  The scissors are holding the placket flat so you can clearly see all the pressed lines.


 Here's another view:


And another way to look at it follows.  At this point, take a careful look at the peak to verify that it is centered and that the diagonal slope on each side of the peak is even.  This is the best time to fiddle with it if it is not quite right.


All this preparation is key to getting a good result.  I've found that the cutting, marking, and pressing takes a fairly short time, but it really sets up a process that ends with a lovely placket.

So now that you have a properly prepared placket, you can place it on the wrong side of the sleeve, with the placket right side down.  The peak of the placket must point to the notch at the front of the sleeve cap.  In this photo, the scissors are pointing to that front notch, and you can see that the peak is on that side.


Above, I've stitched the placket opening.  I began at the bottom edge of the sleeve with a stitch length of 2.0.  I changed to 1.5 when I was 1/4" from the first top corner.  Up to the corner, across the top, and 1/4" down the other side, I used the 1.5.  I switched back to  2.0 to finish stitching down the other side.  

Then I cut right up the center of the stitched box to within 1/4" of the top.  At that point, I cut toward each top corner.  You have to both brave and careful here!  You should cut right up to the stitching at the corners, but be sure you don't cut through the stitching.

You'll have some time to prepare a sample to this point, practicing the pressing and stitching.  I'll finish my coaching in the next post about pressing and stitching the applied placket.

I hope you find this post helpful.  By the way, you can apply the same steps to the plackets in View A of The Blouse Perfected also.  Be sure to visit us at cuttinglinedesigns.com to see all the fabrics that would make beautiful shirts as well as exquisite interfacings and many notions that can make your sewing easier.