PINNING SLEEVES TO A GARMENT
Hello everyone,
There's been some discussion about pinning the sleeves into the body of The Blouse Perfected on the Facebook Forum. I'll point out a couple of things that are special about The Blouse Perfected, but the technique in general will work for all our Cutting Line Designs garments.
First, let's look at a photo that will illustrate why sewing sleeves into garments can sometimes be a challenge. In the photo, I've placed some white paper between the sleeve and the body just so you can see each one clearly.
OPPOSING CURVES
You can see that the armhole curve of the body (bottom layer) extends away from you. Imagine the stitching line 5/8" in from the cut armhole edge. You can tell that the cut edge will be shorter than the stitching line.
In contrast, the shape of the sleeve cap is an opposite curve. The cut edge of the sleeve (top layer in the photo) is longer than the stitching line. On Cutting Line Designs patterns, the body and the sleeve are equal or nearly equal at the stitching line.
The key to controlling these 2 opposing curved edges is to insert your pins so that they pick up only a few threads right at the stitching line where the 2 layers are equal. This way, the cut edges can do whatever they need to do, without causing a problem right where you are going to stitch.
MATCHING SLEEVE TO BODY
The Blouse Perfected has dots at the underarm corners on both the body and the sleeve. These dots must match to get started correctly, so pin those first. Then insert a pin at the clip at the center of the sleeve cap. Let's look at a corner.
Notice that the sleeve and body layers cross right at the 5/8" stitching line when the dots are matched.
PINNING SLEEVE TO BODY
Once you've pinned the corners and the center clip, you need to pin the rest. In the photos below, I'll show you 2 ways to do that.
First, I'll show you the technique that we illustrate in the patterns. Hold the 2 layers together with the sleeve on top. This forces the sleeve layer to travel just a bit further as you wrap the layers over your index finger. You can use your thumb to push a bit of extra sleeve fabric to be eased in before you insert your pin right at the stitching line.
I often use a second technique. It involves once again having the sleeve layer on top. In this case, I wrap the layers over my thumbs. I can use my fingers to slide a bit of extra ease before pinning, again right at the stitching line.
You can use either technique, depending on which one is more comfortable for you. In reality, sometimes you have to go back and pin part of the seam over again to get the ease in just the right place.
BUTTONHOLES AND BUTTONS
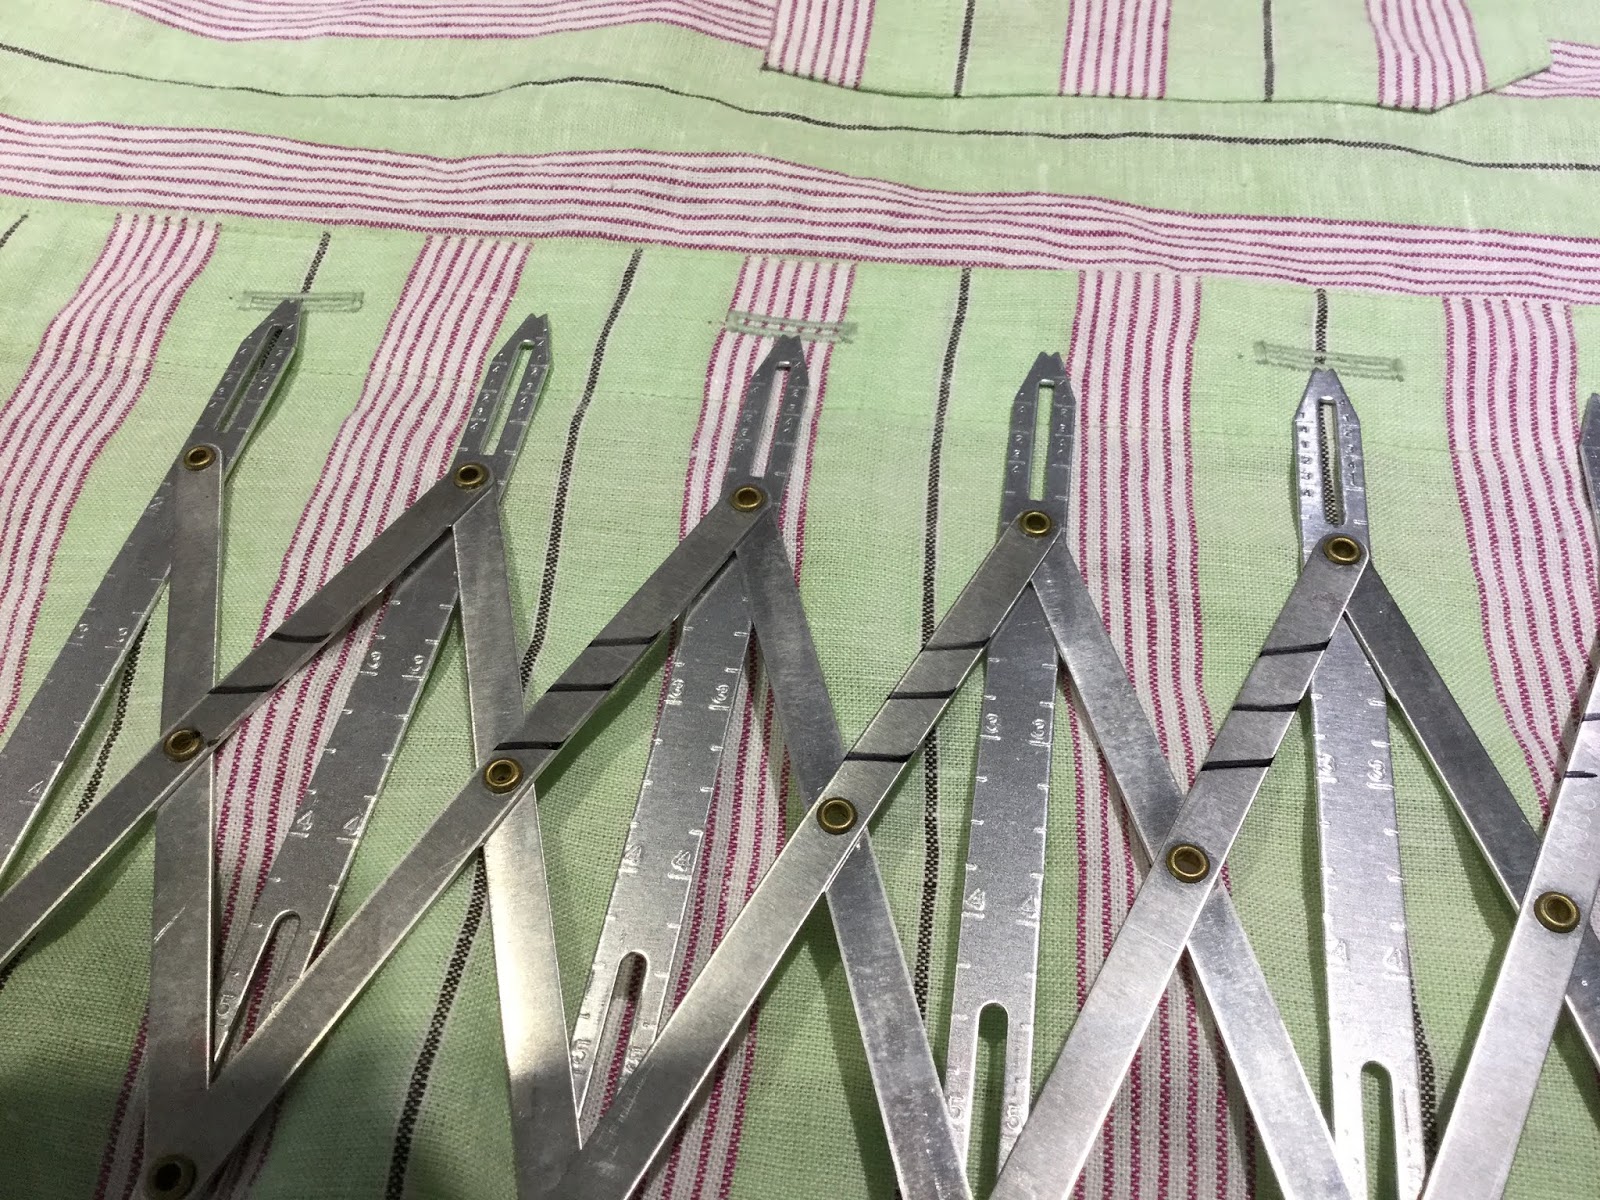
I also wanted to give you a couple of tips about buttonholes and buttons. I used to use a seam gauge, but I kept having to measure over and over as I looked at various spacings. Now I have a Simflex, and I can get my spacing right the first time. Boom--done! Here's how that looks.
Obviously, I forgot to take a photo until I had already marked and stitched the buttonholes. Then I realized that everyone needs to know about this time and frustration saver. Of course, we have these on the website.
Then it was time to mark for the button placements. I aligned the front plackets, with center fronts matching. I stabbed a pin through each buttonhole about 1/8" from the top of the buttonhole. That placement means that when the garment is buttoned, the buttonholes will rest right on the button shank and stay there all day.
I hope you find these tips useful. So much of what we do at Cutting Line Designs is about accuracy, and I love the results I get from that emphasis.
MORE CONSTRUCTION INFO ABOUT THE BLOUSE PERFECTED
Hi ladies,
I'm continuing my posts about The Blouse Perfected. It's such a useful pattern that I thought it was worth the time and effort. It can be made as a casual shirt like the one I just finished in the linen stripe. I've also made it in denim as a casual shirt. However, it's a classic in silk, and I've done that as well.
I have to confess that I bought a shirt just about like it in a woven silk stripe, and I've made it in silk chiffon. That one was a challenge!
Anyway, a casual version like the one I made for my summer wardrobe is a great one to start with. You have a chance to practice the techniques and end up with something wearable, even if it's a bit less than perfect. Then you can go on to something more challenging. I'm really looking forward to making a white shirt from this pattern.
COLLAR
So today I'll talk a bit about constructing the collar on this shirt. The first thing you'll need to do is interface it. (Do browse the exquisite interfacings on the website. All lightweight and fusible.)
I have a specific method for applying interfacing, and the instructions are in the patterns. But it could be helpful to see some photos of how it's done.
Here's what you need: a piece of parchment paper (from the grocery; it's what you bake cookies on.) A press cloth, preferably silk organza so you can see through it. And your iron, of course.
So put the parchment paper on the ironing board with the fabric Collar piece wrong side up. My next step is to lay the interfacing on top, glue side down. (In the instructions, the order is a bit different--either way works fine.) Finally, lay the pattern piece on top.
The idea is that you want the fabric collar shape to exactly match the shape of the pattern piece. It's easy to skew the shape and not realize it, so check it with the pattern piece. Otherwise, you can be fusing your collar into the wrong shape and it will never look right when you have finished your shirt. Here's what you want to watch out for:
Can you tell that I've been using this piece of parchment paper for a while!!? Anyway, this collar might never be right. Let's look at one that's correct.
OK. So now you remove the pattern tissue and put your press cloth on top. (The collar is long--you may have to do one half at a time.)
Put your iron straight down at the center of the collar, shoot a bit of steam, and count for several seconds. Then lift the iron to another section and repeat. Don't slide the iron across the collar unless you like wadded up interfacing glued to your collar!! Ask me how I know!
Follow the instructions to sew the short ends of the collar together, trim, and press. Progress to pinning the upper edge of the collar, paying attention to the clips.
Now for the thing I saw Louise do one day. I got a bruise from slapping my forehead over this one. I'll show you in pictures. Put the collar on your machine as normal, but about 1/2" from the folded end. Put the needle down into the fabric.
Lift the presser foot and turn the collar around. Shorten your stitch length to 2.0 and stitch to the edge. Here, I'm about to stitch to the folded edge.
When you've reached the exact edge, turn the whole collar back around and stitch (at 2.5 stitch length) all the way to the other end. In this photo, I've turned and am ready to stitch all the way across the top. Stitch a mirror image at the other end (turning and stitching back for 1/2" at 2.0).
So one of the things that always bothers me is that little dent I get when I backstitch. The tension changes when backstitching and pulls the end of the seam too tight. It's especially troublesome at the corner of a collar because it makes the corner even tighter and harder to turn nicely. By always stitching forward as illustrated above, the problem is eliminated. Give it a try.
Again, follow the instructions for the sequence of steps. You'll grade the seam allowances. One thing you might not have thought about doing is pressing the seam allowances open. It's a crucial step. I explain it by saying that it teaches the fabric where to fold, so when the collar is right side out, it's so much easier to fold that upper edge precisely.
Once all is pressed in accordance with the instructions, you'll need to edgestitch the collar. (Look back at previous blogs about the set-up.) The corners will be tricky, but we cover that in the instructions. Read the steps carefully. Here's what you'll do at the corner. Begin at the bottom of the collar, edgestitching one folded end. When you reach the corner, put the needle down and raise the presser foot. Grasp the loose end and bring it to the back of the presser foot, laying it underneath against that folded edge. Now the machine no longer thinks it's going uphill, and you can start stitching with no problem.

This has been a lot of text for a few steps, but I wanted to give the reasoning behind what we've said in the instructions. I know that some sewers have skipped over these steps, thinking that they were overly fussy. However, they definitely give a better result. I would rather do something accurately once than do it quickly and have to unsew it and do it again (sometimes more than once!).
I should mention that this edgestitching is much easier and better looking if you have the correct needle. For nearly all fabrics, Louise and I use size 75/11 quilting needles (they're on the website). We prefer them because they are so sharp. They penetrate the fabric in a straighter line than needles that are more rounded.
There have been some questions about sleeves on the Facebook Forum, so I'll give you some info about sleeves in the next Stitch to Style. See you then!
SUMMER WARDROBE BEGINNING
Hi everyone,
As I was playing around in my fabric shelves, I found a number of fabrics that go together nicely. All are summer fabrics. In this case, they are linen, but cottons could work for this summer wardrobe idea also. I'll show you my fabrics.
The idea began with the stripe. Then I found the green and the plum linens. Of course, white linen was an obvious coordinate, and a hunt turned up some left over from another project. Then I found the floral, which was left from a fashion show project. Finally, the last fabric, a fun cotton printed with a motif of paint samples.
From these fabrics I plan a shirt, a jacket, 2 pairs of pants, and 3 tops. I hope to finish before winter sets in!
I've made the first shirt, a variation of The Blouse Perfected.
FRONT AND BACK
Of course, I couldn't resist playing with the stripes. I decided to use the Left Front pattern piece for both the left and right fronts. (This works fine. No alterations to the left front--just cut it twice.) However, I cut one front on the lengthwise grain and the other on the crosswise grain. I wanted a casual look, and I thought that playing with the stripes achieved that. (Eliminates some stripe matching issues too!)
I cut the back with vertical stripes and the yoke with horizontal stripes. The only other change was on the sleeves. I shortened them to 3/4 sleeves and added a band at the hem.
Some photos might be helpful in understanding a few of the steps in constructing this shirt. In today's blog I'll show you how I made the front plackets, the yokes, and the burrito roll. Be sure you follow the instructions step by step--I'm not showing you every step here.
FRONT PLACKETS
Some of you may have read my earlier blog about the front plackets on this shirt. I'll just post a couple of photos here as a reminder of how they are done.
Fold the placket at the first set of clips (neck and hem). Use a seam gauge to be sure you fold the remaining placket accurately from neck to hem and stab pin, then press. Use the same process for the second fold.
Place the interfacing as indicated on the pattern, fuse, and press the folds back in place. Edgestitch as shown in the instructions. (I edgestitched both vertical edges of the plackets.) By the way, we have really light fusible interfacings on the website.
Here are the fronts with the finished front plackets.
OUTER AND INNER YOKES
I'll also show some photos of attaching the yokes. First I pinned the Outer Yoke right side to right side to the top edge of the Back. Note that the heads of my pins are away from the edge. (You have to pin both yokes but I think it's easiest to pin one at a time.) It's also nice to have really sharp pins with glass heads that won't melt if you get them near the iron.
This photo shows that I have turned the pinned Back and Outer Yoke over and laid the Inner Yoke on top, ready to be pinned. I'll match the raw edges and the clips at center back. Because of the way I pinned, I can just slide the pin at center back out and then reinsert it to secure the Inner Yoke to the other layers.
Once all was pinned, I stitched the seam. Next, I graded the seam allowances.
Both yokes get pressed up away from the Back. Then, working on the right side of the Back, I edgestitched the bottom edge of the Yokes.
BURRITO ROLL
Next, I followed the instructions to stitch the Fronts to the Outer Yoke right side to right side. Once that was done, I moved to the next step. I'll show it to you because it looks a little funny, but it works. I laid the shirt on my worktable right side up. I rolled the back into a fairly tight tube on top of the outer yoke. Then I rolled the fronts in the same way, till they were also on top of the outer yoke. As you can see, the inner yoke is free.
I then wrapped the inner yoke on top of the rolled back and fronts and pinned the shoulder layers together.
Next, I turned the bundle over so I could see my previous shoulder seam stitching. I stitched again right on top of my previous stitching. Note how I pinned so I could pull each pin out as I stitched. The next photo shows how you can still reach your pins.
Be sure you read the instructions here about grading the shoulder seams. (I'm not trying to show you every step.) Then comes the part that seems difficult. It's time to pull the Back and both Fronts out through one of the armhole ends of the Yokes. Here's how that looks in the middle of the process.
This takes a bit of patience but works like a charm. Just keep gently and gradually pulling the back and fronts out through the end of the yokes.
NEXT TIME
In my next blog I'll show you some tips about fusing interfacing, constructing the collar, pinning the sleeves, altering the pattern for the sleeve variation, marking buttonholes, and marking button placement.
Yikes, it's time for me to get moving on making the first pair of pants!