
I'm so glad you had time to visit today. Since we've just introduced Pick Stitch Perfect, I'd like to give you a bit more information about the 5 stitching techniques we included in this new pattern.
Here's View A with "cheater" sashiko stitching details.

And View B with "cheater" pick stitching details.

So on to the details. So far, I've made 4 Pick Stitch Perfect shirts using the various stitch techniques. You may be familiar with a couple of these techniques already.
For instance, edgestitching right next to a seam is something you may do all the time. For details, look at my post from June 10 that includes info about the machine feet that help make for perfect edgestitching.
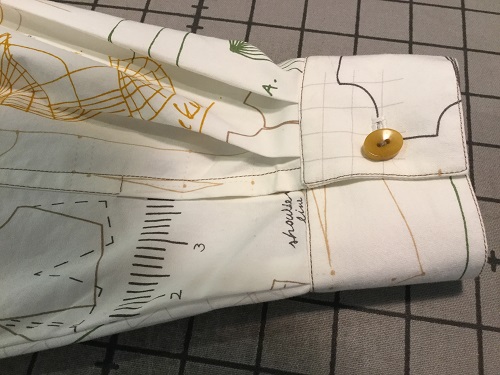
I made a second View B from shirt weight cotton printed with sewing motifs. I used both edgestitching and topstitching to enhance the details on this shirt.

From the top left to the bottom right, note the line of edgestitching on the seam attaching the sleeve to the yoke and lower back. Then look again to see both edgestitching and topstitching from lower left to upper right. This stitching emphasizes the bottom edge of the yoke and perfectly matches the stitching on the upper and lower sleeve seam.
That seam ends in a self-fabric placket--a really cool detail. Here's a photo that shows the placket and the edgestitched cuff.
Louise has written an article for Threads Magazine with instructions and color photos so you can see clearly how this clever placket is made. Has your issue arrived yet? It's the current one (issue 204, Aug/Sept 2019). Nothing like getting it firsthand from the expert!
In my blog post of June 3, I showed you my denim shirt with 2-thread edgestitching and explained just how to do that stitching. Here are a couple of details from a second version of View A (can you tell that I had fun playing around with this pattern?).
The first thing I did was make a sample. The vision I have in my head doesn't always work, so testing gets me to the best result.

I immediately saw that the single thread stitching on the right was not bold enough to stand out on my chosen fabric. I switched to the 2-thread stitching on the left. Much better!

View A calls for 3 fabrics. I chose grey, white, and green. Here's my left sleeve with 2-thread details. I used green thread on the white upper sleeve and grey thread on the green lower sleeve.

Here's the green pocket, 2-thread edgestitched in grey thread. Just above it is the seam joining the grey right front and the white left front, 2-thread edgestitched in green. I had a good time with this top!
On the original View B I made, I experimented with what Louise calls "cheater" (or faux) pick stitching, done by hand. Traditionally used on men's suits, it's usually stitched through only the outer layer of fabric and enhances lapels, collars, and so on. It's fairly subtle, and adds to the value of the garment.
Our version starts with that basic idea, then plays around with it. For example, I used 3 strands of embroidery floss in a hand-stitching needle, and I chose a bold color that stands out on the fabric.

Here you can see the stitching on the collar and on the front pleat. On the collar, I stitched through all the layers of fabric so the stitches would show both on the top and the underside of the collar. On the front pleat, I stitched the pleat by machine first, using matching thread. Then I came back with the hand-stitching, sliding my needle between the layers of fabric.
I also used this stitching on the shoulder seams, the bottom yoke seam, the upper/lower sleeve seam, the armhole seams, and the cuffs.
The "cheater" (or faux) sashiko stitching is similar, but even more bold. I basted at a stitch length of 6.0 for this stitch, then threaded my hand needle with 6 strands of embroidery floss and stitched away.

Look carefully. You can see that I edgestitched the pocket in place by machine, using green thread. Then I came back and basted at a 6.0 stitch length. Using my embroidery floss, I came up from the wrong side of the fabric at the top corner of the pocket, right at the beginning of a machine-basted stitch. At the other end of that basted stitch, my needle went back down into the fabric. I skipped a stitch, came back up, and continued in the same manner around the pocket, skipping every other stitch. After removing the basting, I have this result.

Here's the same technique on a sleeve. The upper and lower sleeves are sewn together. Then machine basting goes on each side of the seam (6.0 stitch length). I hand-stitch over every other basting stitch, then remove the basting. Voila! Faux sashiko!
For my next post, I'll take some photos in mid-process to show you how the hand-stitching and machine basting work together. See you then.
Let me know your thoughts about suggested topics for the blog by emailing me at sandy@cuttinglinedesigns.com.